우리가 윈도 플밍을 할 때, 종종 사용하는 Shell 관련 함수들 중에서 폴더만 선택하게 하는 SHBrowseForFolder()이라는 함수가 있슴다..
주로 아래와 같이 사용을 합니다.
CString SelectFolder(HWND hWnd, TCHAR* pszInitPath)
{
CString strFolder = _T("");
ITEMIDLIST* pidlBrowse;
TCHAR achPath[MAX_PATH];
BROWSEINFO brInfo;
if (pszInitPath && *pszInitPath)
strcpy(achPath, pszInitPath);
memset(&brInfo, 0x00, sizeof(BROWSEINFO));
wcscpy(achPath, _T("풀팔팔팔. 폴더 선택하삼 ^^a"));
brInfo.hwndOwner = hWnd;
brInfo.pidlRoot = NULL;
brInfo.pszDisplayName = achPath;
brInfo.lpszTitle = achPath;
brInfo.ulFlags = BIF_RETURNONLYFSDIRS;
brInfo.lpfn = NULL;
pidlBrowse = ::SHBrowseForFolder( &brInfo );
if(pidlBrowse != NULL) {
SHGetPathFromIDList( pidlBrowse, achPath );
// pszPathname에 선택한 폴더가 들어있습니다.
strFolder = achPath;
}
return strFolder;
}
이러한 코드를 주면 아래의 다이얼로그를 만날 수 있습니다.

여러분이 위의 코드로 했을 때 만나는 다이얼로그 ^^a
그런데,
조기 조 화면이 그닥 맘에 안들지요... 맞습니다.
누구도 그럴 거에요...
'풀팔팔팔. 폴더 선택하삼 ^^a' 이거 빼고 싶지요...
풀팔팔팔이 모야.. 도대체... 저기에 글이 왜 들어갓..? 이런 생각이 듭니다.
그렇다고 글을 빼면 저 공간이 훵해집니다.
'다시 글을 넣을까...' 이런 고민을 하게 됩니다...
아~ 나는 새폴더 만들기... 라는 버튼이 있슴 얼마나 좋을까... 이런 생각도 할 겁니다.
먼가 좋은 방법이 없을까요.... ^^; 있습니다.
바로 인자로 사용되는 BROWSEINFO.lpfn를 이용하는 방법입니다.
MSDN을 잘 살펴보면
(참조 : http://msdn.microsoft.com/library/default.asp?url=/library/en-us/shellcc/platform/shell/reference/structures/browseinfo.asp)
lpfn에 CALLBACK 을 하나 넣어 줄 수 있습니다.
형식은 아래의 코드를 참조 하시면 됩니다.
CString SelectFolder(HWND hWnd, TCHAR* pszInitPath)
{
CString strFolder = _T("");
ITEMIDLIST* pidlBrowse;
TCHAR achPath[MAX_PATH];
BROWSEINFO brInfo;
if (pszInitPath && *pszInitPath)
strcpy(achPath, pszInitPath);
memset(&brInfo, 0x00, sizeof(BROWSEINFO));
brInfo.hwndOwner = hWnd;
brInfo.pidlRoot = NULL;
brInfo.pszDisplayName = achPath;
brInfo.lpszTitle = _T("");
brInfo.ulFlags = BIF_NEWDIALOGSTYLE|BIF_RETURNONLYFSDIRS|BIF_DONTGOBELOWDOMAIN;
brInfo.lpfn = BrowseCallbackProc;
pidlBrowse = ::SHBrowseForFolder( &brInfo );
if(pidlBrowse != NULL) {
SHGetPathFromIDList( pidlBrowse, achPath );
// pszPathname에 선택한 폴더가 들어있습니다.
strFolder = achPath;
}
return strFolder;
}
다음은 CALLBACK 함수 입니다.
int CALLBACK BrowseCallbackProc(HWND hwnd,
UINT uMsg,
LPARAM lParam,
LPARAM lpData)
{
switch (uMsg) {
case BFFM_INITIALIZED :
{
// 해당 Control ID는 shell32.dll version 5.0 이상에서 사용된다.
// 하위 버전에서는 현재 tree control이 id가 다르며
// 새폴더 버튼을 생성할 수 없다.
HWND hShell = GetDlgItem(hwnd, 0); // 0x00000000(Shell Class)
HWND hTree = GetDlgItem(hShell, 100); // 0x00000064(Tree Control)
HWND hNew = GetDlgItem(hwnd, 14150); // 0x00003746(New Folder Button)
HWND hOK = GetDlgItem(hwnd, 1); // 0x00000001(OK Button)
HWND hCancel= GetDlgItem(hwnd, 2); // 0x00000002(Cancel Button)
HWND hStatic= GetDlgItem(hwnd, 14146); // 0x00003742(Static Control)
// 하나라도 못가져오면 기본 구성으로 처리한다.
if (!hShell || !hTree || !hNew || !hOK || !hCancel)
return 0;
// 상단 표시줄 삭제
if (hStatic) {
EnableWindow(hStatic, FALSE);
ShowWindow(hStatic, SW_HIDE);
}
CRect rectWnd;
CRect rectNew;
CRect rectOK;
CRect rectCancel;
GetClientRect(hwnd, &rectWnd);
GetClientRect(hNew, &rectNew);
GetClientRect(hOK, &rectOK);
GetClientRect(hCancel, &rectCancel);
// Tree 크기조정
// Tree를 가지는 shell의 크기조정
MoveWindow(hShell,
rectWnd.left+10,
rectWnd.top+10,
rectWnd.Width()-22, // 20이지만 실제로 보면 작아 보인다. 따라서 2를 추가로 빼준다.
rectWnd.Height()-rectNew.Height()-30,
TRUE);
// 새 폴더 Button 변경
MoveWindow(hNew,
rectWnd.left+10,
rectWnd.bottom-rectNew.Height()-10,
rectNew.Width(),
rectNew.Height(),
TRUE);
// 확인 Button
MoveWindow(hOK,
rectWnd.right-10-rectCancel.Width()-5-rectOK.Width(),
rectWnd.bottom-rectOK.Height()-10,
rectOK.Width(),
rectOK.Height(),
TRUE);
// 취소 Button
MoveWindow(hCancel,
rectWnd.right-10-rectCancel.Width(),
rectWnd.bottom-rectCancel.Height()-10,
rectCancel.Width(),
rectCancel.Height(),
TRUE);
}
break;
case BFFM_SELCHANGED :
case BFFM_VALIDATEFAILED :
break;
}
return 0;
}
이와 같이 하면 나타나는 컨트롤의 위치를 변경시켜 자신이 원하는 UI를 나타낼 수 있습니다.
자! 이제 변한 그림을 보여드리겠슴다...
위와 같은 코드를 해주면 아래와 같은 다이얼로그를 만날 수 있습니다.
안녕.. 반가워 다이얼로그.. ^^; 난 풀팔이야...
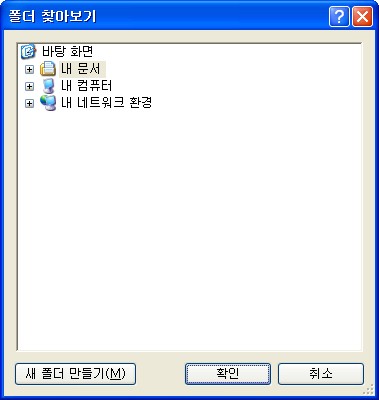
여러분이 UI 변경 코드로 했을 때 만나는 다이얼로그 ^^a
자~ 어떻습니까? ^^; 함 바까보삼.. 풀팔팔팔..
아... 중요한 건, 저녀석은 shell32.dll의 버전에 따라서 지원되는 옵션이 틀립니다.
현재의 그림은 5.0 이상 버전을 기준으로 했으며,
버전에 따라서는 저 control들의 id가 틀린 것도 있으니까 주의해야 겠죠? ^^;